클래스(Class) -Core JavaScript
다른 언어의 상속 개념을 흉내 내기위해 자바스크립트 ES6에서 추가된 Class 문법
(내부적으로는 프로토타입을 따름)
- 클래스와 인스턴스의 개념 이해
- 자바스크립트의 클래스
- 클래스 상속
- 기본 구현
- 클래스가 구체적인 데이터를 지니지 않게 하는법
- constructor 복구하기
- 상위 클래스에 접근 수단
- ES6의 클래스 및 클래스 상속
- 정리
클래스와 인스턴스의 개념 이해
상위(superior), 하위(subordinate) 개념의 앞글자를 따서
상위 클래스(superclass), 하위 클래스(subclass)로 표현합니다.
자바스크립트를 기준으로 하위 클래스(subclass)를 Array로 생각해 본다면 상위 클래스(superclass)는 __proto__와 Array.prototype에 따라 Object가 되겠습니다.
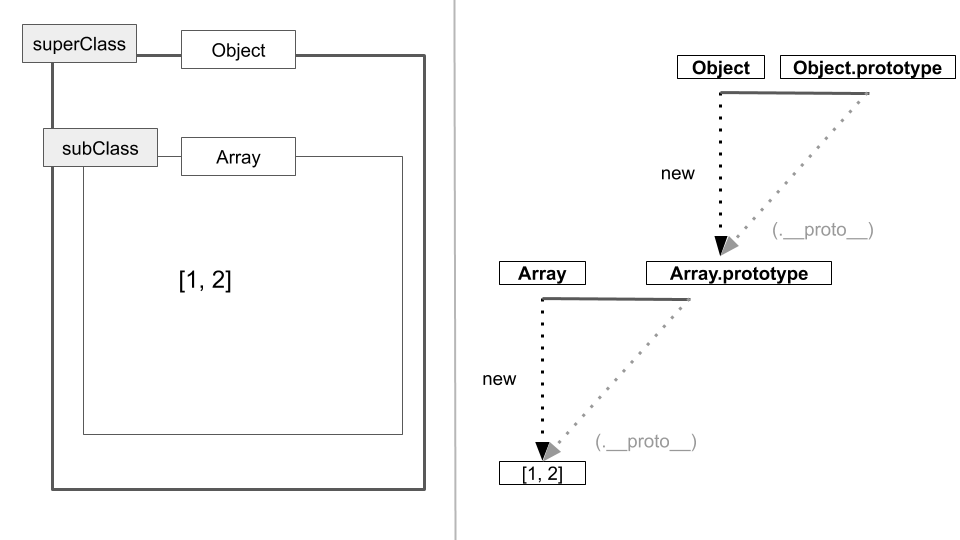
클래스의 속성을 지니는 실존하는 개체를 instance라고 합니다.instance는 “해당 클래스의 조건을 만족하는 구체적인 예시”라고 해석 할 수도 있습니다.
Class를 바탕으로instance를 만들 때 생성된 개체가Class의 속성을 지니게 됩니다.또한 한
instance는 하나의 클래스만을 바탕으로 만들어 집니다.
인스턴스가 다양한 클래스에 속할 수는 있지만 인스턴스 입장에서는 모두 ‘직계존속’클래스들 입니다.
결국 인스턴스를 생성할 때 호출할 수 있는 클래스는 오직 하나뿐 이기 떄문입니다.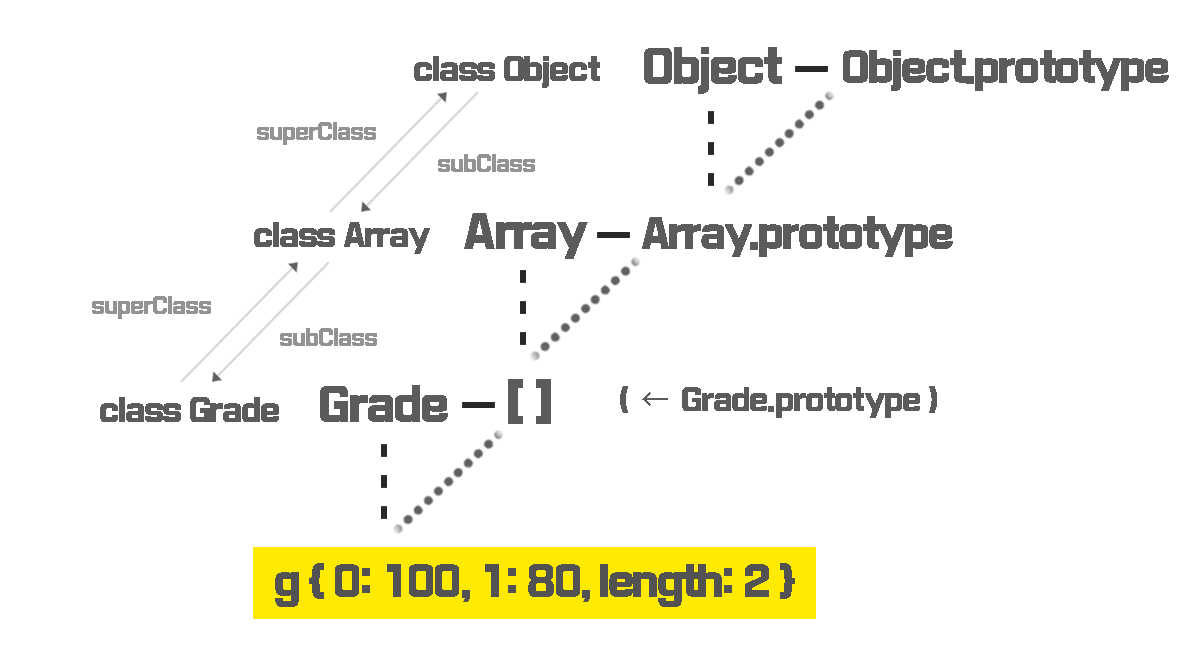
도식 그림 출처: 코딩맛집
자바스크립트의 클래스
생성자 함수 Array를 new 연산자와 함께 호출하면 instance가 생성됩니다. 이 때 Array를 일종의 클래스라고 하면 Array의 prototype 객체 내부 요소들이 instance에 ‘상속’된다고 볼수 있습니다. (내부적으로는 상속이 아닌 프로토 타입 체이닝에 의한 참조 입니다.)
한편
Array내부 프로퍼티들 중prototype프로퍼티를 제외한 나머지는instance에 상속되지 않습니다.instance가 참조하는지 여부에 따라- 스태틱 맴버(
static member) 와 - 인스턴스 맴버(
instance member)로 나뉩니다.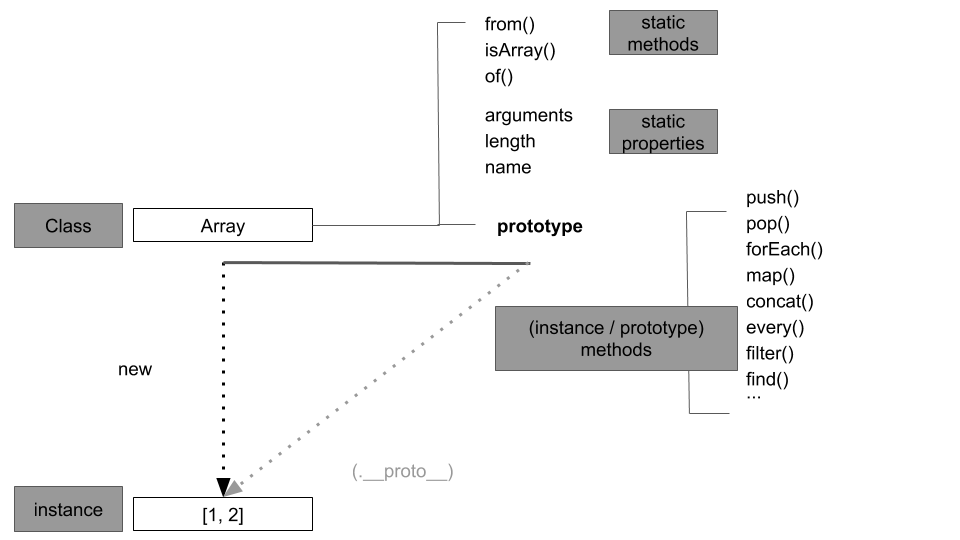
- 스태틱 맴버(
prototype에 있는 내부 메서드는instance가 직접 호출할 수 있습니다.반대로
prototype에 없는 메서드는instance가 참조하지 않으므로 호출할 수 없습니다.이렇게
instance에서 직접 접근할 수 없는 메서드를 스태틱 메서드라고 합니다.
클래스 상속
기본 구현
클래스 상속은 객체지향에서 가장 중요한 요소 중 하나입니다, 하지만 자바스크립트는 ES5까지 클래스가 없었기 때문에 프로토 타입 체인을 활용해 클래스 상속을 흉내내었었습니다.
이에 대해 가볍게 알아보겠습니다.
length 프로퍼티 삭제 가능
1 | var Grade = function() { |
length프로퍼티를 삭제하고 다시push했더니,push한 값이 0번째index에 들어가고,length가 1이 됐습니다.
- 내장객체인
배열 instance의length프로퍼티는{ configurable : false }라서 삭제가 불가능하지만,Grade클래스의instance는 배열 메서드를 상속(참조)하지만 기본적으로는 일반 객체의 성질을 그대로 지니므로 삭제가 가능해서 문제가 됩니다.
빈 배열
push했을 때 0번째index에 70이 들어가고length가 1이 된 이유:g.__proto__, 즉Grade.prototype이 빈 배열을 가리키고 있기 때문
push명령에 의해 엔진이g.length를 읽으려 하는데g.length가 존재하지 않으므로 프로토 타입 체이닝을 타고g.__proto__.length을 읽어옴.
- 빈 배열의
length는 0 이므로 여기에 값을 할당하고length는 1 만큼 증가합니다.
요소가 있는 배열을 prototype에 매칭한 경우
1 | var Grade = function() { |
Grade.prototype에 빈 배열이 아닌length가 4인 배열을 할당했습니다.
length를 삭제 후push한 값이Grade.prototype에 빈 배열을 할당했을 때와는 다르게 동작합니다.
push명령에 의해 엔진이g.length를 읽으려 하는데 존재하지 않으므로g.__proto__.length를 읽어오는데length값이 4인 배열입니다.
- 그러므로 여기에 (
index : 4) 70값을 할당하고length값을 1증가시켜 5가 되는것 입니다.
이처럼 class에 있는 값이 instance의 동작에 영향을 줘서는 안됩니다.(이런 영향을 줄 수 있다는 것 자체가 이미 클래스의 추상성을 해치는 것입니다.)
class는 instance와의 관계에서는 구체적인 데이터를 지니지 않고 오직 instance가 사용할 메서드만을 지니는 추상적인 틀로만 작용해야 합니다.
사용자가 정의한 두 클래스 사이에서의 상속관계 구현
직사각형 클래스와 정사각형 클래스를 만듭니다.
직사각형: 두 쌍의 마주 보는 변이 평행이고 그 길이가 같습니다.
정사각형: 직사각형이며(직사각형의 조건을 충족) 네 변의 길이가 모두 같습니다.
1 | var Rectangle = function(width, height) { |
Rectangle과Square클래스에 공통 요소가 보입니다.width프로퍼티가 공통이고,getArea메서드는 다른 부분이 있으나 비슷합니다.
Square에서width프로퍼티만 쓰지 않고height프로퍼티에width값을 부여하는 형태로 변경한다면getArea도 동일하게 쓸 수 있겠습니다.
1 | var Square = function(width) { |
Square를 위와같이 수정해 주면Square를Rectangle의 하위 클래스로 삼을 수 있습니다.
getArea메서드는 동일한 동작을 하므로 상위 클래스에서만 정의하고, 하위 클래스에서는 해당 메서드를 상속하면서height대신width를 넣어주면 되겠습니다.
1 | var Square = function(width) { |
Square생성자 함수 내부에서Rectangle생성자 함수를 함수로 호출하고 인자 height 자리에 width를 전달합니다.
Square.prototype = new Rectangle();: 메서드를 상속하기 위해 프로토타입 객체에Rectangle의instance를 부여했습니다.
하지만 위 코드만으로 완벽한 클래스 체계가 구축됐다고 볼 수는 없습니다.
아직 클래스에 있는 값이 인스턴스에 영향을 줄 수 있는 구조이기 때문입니다.
console.dir(sq);로 sqinstance에 대하여 콘솔로 출력해보면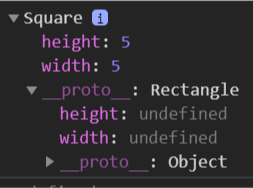
첫 줄에서Square의instance을 표시하고 있고width와height에 5가 잘 들어있습니다.__proto__는Rectangle의instance임을 표시하고 이어서width,height에 모두undefined가 할당되어 있습니다.Square.prototype에 값이 존재하여 이후에 임의로Square.prototype.width (또는 height)에 값을 부여하고sq.width(또는 height)의 값을 지워버린다면 프로토타입 체이닝에 의해 엉뚱한 결과가 나오는 문제가 생길 수 있습니다.
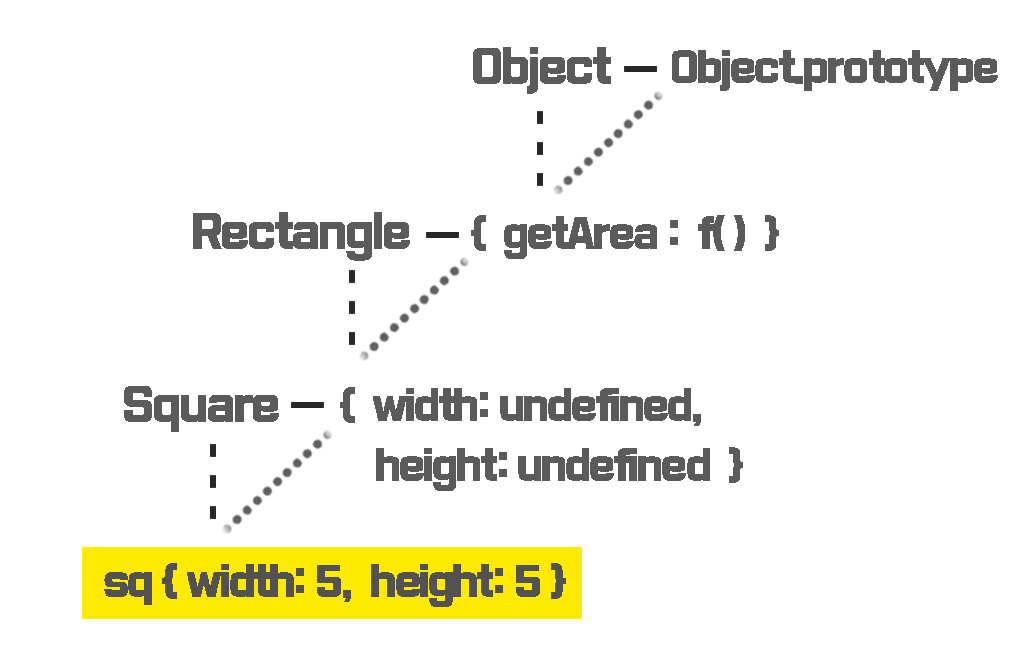
나아가 constructor가 여전히 Rectangle을 바라보고 있는 문제도 있습니다. sq.constructor로 접근하면 프로토타입 체이닝을 따라 sq.__proto__.__proto__, 즉 Rectangle.prototype에서 찾게 되며 이는 Rectangle을 가리키고 있기 때문입니다.
1 | var rect2 = new sq.constructor(2, 3); |
이처럼 하위 클래스로 삼을 생성자 함수의 prototype 에 상위 클래스의 instance를 부여하는 것만으로도 기본적 메서드 상속은 가능하지만 다양한 문제가 발생할 여지가 있어 구조적 안정성이 떨어집니다.
클래스가 구체적인 데이터를 지니지 않게 하는법
클래스 (prototype)가 구체적인 데이터를 지니지 않게 하는 방법 중
가장 쉬운 방법은 일단 만들고 나서 프로퍼티들을 일일히 지우고 더는 새로운 프로퍼티를 추가할 수 없게 하는 것입니다.
1 | delete Square.prototype.width; |
프로퍼티가 많다면 반복 작업이 될테니 반복을 없애고 좀 더 범용적으로 이런 동작을 하는 함수를 만들면 좋겠습니다.
1 | var extendClass1 = function(SuperClass, SubClass, subMethods) { |
extendClass1함수는SuperClass와SubClass,SubClass에 추가할 메서드들이 정의된 객체를 받아SubClass의prototype내용을 정리하고freeze하는 내용으로 구성돼있습니다.
두 번째 방법(빈 함수)
더글라스 크락포드가 제시하여 대중적으로 알려진 방법입니다.SubClass의 prototype에 직접 SubClass의 instance를 할당하는 대신
아무런 프로퍼티를 생성하지 않는 빈 생성자 함수(Bridge)를 하나 더 만들어서 그 prototype이 SubClass의 prototype을 바라보게 한 다음,SubClass의 prototype에는 Bridge의 instance를 할당하게 하는 것입니다.
(빈 함수에 다리 역활을 부여)
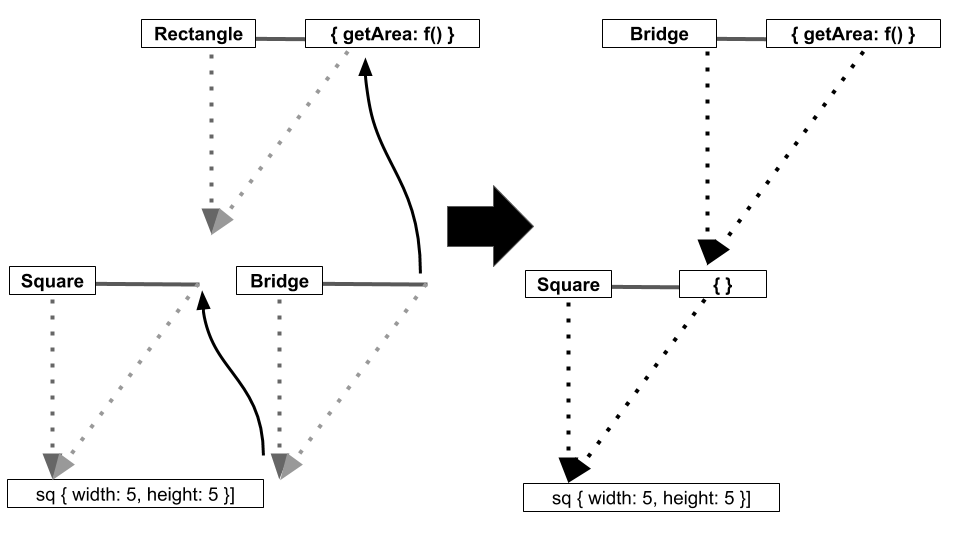
Bridge라는 빈 함수를 만들고,Bridge.prototype이Rectangle.prototype을 참조하게 한 다음,Square.prototype에new Bridge()로 할당하면, 우측 그림처럼Rectangle자리에Bridge가 대체됩니다.
- 이로써
instance를 제외한 프로토타입 체인 경로상에는 더는 구체적인 데이터가 남아있지 않게 됩니다.
마찬가지로 반복작업을 없애기 위해 범용적으로 이런 동작을 하는 함수를 만들어 보겠습니다.
1 | var extendClass2 = (function() { |
즉시실행함수 내부에서
Bridge를 선언하여 이를 클로저로 활용함으로써 메모리에 불필요한 함수 선언을 줄였습니다.subMethods에는SubClass의prototype이 담길 메서드들을 객체로 전달하게 했습니다.
세 번째 방법(Object.create)
세 번째 방법은 ES5에서 도입된 Object.create를 이용한 방법으로 이 방법은
SubClass의 prototype의 __proto__가 SuperClass의 prototype을 바라보되, SuperClass의 instance가 되지는 않으므로 앞서 소개한 두 방법보다 간편하면서 안전합니다.
1 | var Rectangle = function(width, height) { |
클래스 상속 및 추상화를 흉내 내기 위한 라이브러리가 많이 있지만 기본적인 접근 방법은 위 세가지 아이디어를 크게 벗어나지 않습니다.
결론적으로 SubClass.prototype의 __proto__가 SuperClass.prototype을 참조하고, SubClass.prototype에는 불필요한 instance 프로퍼티가 남아있으면 안되기 때문입니다.
constructor 복구하기
위 세 가지 방법 모두 기본적인 상속에는 성공했지만, SubClass instance의 constructor는 여전히 Superclass를 가리키는 상태입니다.
- 엄밀히는
SubClass의instance에는constructor가 없고,SubClass.prototype에도 없는 상태입니다.
- 프로토타입 체인상에 가장 먼저 등장하는
SuperClass.prototype의constructor가 가리키는 대상인SuperClass가 출력되는 것입니다.
따라서 SubClass.prototype.constructor가 원래의 SubClass를 바라보도록 해주겠습니다.
1 | var extendClass1 = function(SuperClass, SubClass, subMethods) { |
1 | var extendClass2 = (function() { |
빈 함수(Bridge)를 이용한 두 번째 방법의 경우 SubClass.prototype이 SuperClass 대신 Bridge의 instance를 바라보는 상태이므로 SuperClass와의 관계를 복구하기 위해 Bridge.prototype.constructor가 SuperClass를 바라보게 하는 작업이 추가돼야 합니다.
1 | var extendClass3 = function(SuperClass, SubClass, subMethods) { |
상위 클래스에 접근 수단
하위 클래스의 메서드에서 상위 클래스의 메서드 실행 결과를 바탕으로 추가적인 작업을 수행하고 싶을 때
1 | SuperClass.prototype.method.apply(this, arguments) |
매번 이런식으로 코드를 추가해서 해결하는 것은 상당히 번거롭고 가독성이 떨어지는 방식입니다.
하위 클래스에서 상위 클래스의 프로토타입 메서드에 접근하기 위한 별도의 수단이 있다면 편리할 것 같습니다.
이런 별도의 수단인 다른 객체지향 언어들의 클래스 문법 중 하나인 super를 흉내 내보겠습니다.
1 | var extendClass = function(SuperClass, SubClass, subMethods) { |
- 추가된 부분에서
super메서드의 동작을 정의하고 있습니다.
- 7번째 줄에서 인자가 비어있을 경우
SuperClass생성자 함수에 접근하는 것으로 간주했습니다.
this가 달라지는 것을 막기 위해 클로저를 활용했습니다.
- 11번째 줄은
SuperClass의prototype내부의propName에 해당하는 값이 함수가 아닌 경우 해당값을 그대로 반환합니다.
- 12번째 줄은 함수인 경우이므로 마찬가지로 클로저를 활용해 메서드에 접근하는 것으로 여기도록 했습니다.
이제 SuperClass의 생성자 함수에 접근하고자 할 때는 this.super(), SuperClass의 프로토타입 메서드에 접근하고자 할 때는 this.super(propName)과 같이 사용할 수 있습니다.
ES6의 클래스 및 클래스 상속
ES6에서는 본격적으로 클래스 문법이 도입됐습니다.ES5에서의 생성자 함수 및 프로토타입 과ES6의 클래스 문법을 비교해봅니다.
ES5 / ES6 클래스 문법 비교
1 | var ES5 = function(name) { |
ES6의 클래스 상속
1 | var Rectangle = class { |
Square를Rectangle클래스를 상속받게 하기위해class명렁어 뒤에extends Rectangle을 추가합니다.
이것으로 상속 관계 설정이 완료됩니다.
constructor내부에서는super라는 키워드를 함수처럼 사용할 수 있습니다. 이 함수는SuperClass의constructor를 실행합니다.
constructor메서드를 제외한 다른 메서드에서는super키워드를 마치 객체처럼 사용할 수 있고, 이때 객체는SuperClass.prototype을 바라보는데, 호출한 메서드의this는super가 아닌 원래의this를 그대로 따릅니다.
정리
- 클래스는 어떤 사물의 공통 속성을 모아 정의한 추상적인 개념,
instance는 클래스의 속성을 갖는 구체적인 사례
상위 클래스(SuperClass)의 조건을 충족하면서 더욱 구체적인 조건이 추가된 것을 하위 클래스(SubClass)라고 함.
- 클래스의
prototype내부에 정의된 메서드를프로토타입 메서드라고 하며, 이들은instance가 마치 자신의 것처럼 호출할 수 있습니다.
- 클래스(생성자 함수)에 직접 정의한 메서드를
스태틱 메서드라고 하며, 이들은instance가 직접 호출할 수 없고 클래스(생성자 함수)에 의해서만 호출할 수 있음.
클래스 상속을 흉내 내기 위한 세 가지 방법
SubClass.prototype에Superclass의instance를 할당하고 프로퍼티를 모두 삭제하는 방법.빈 함수(
Bridge)를 할용하는 방법Object.create를 이용하는 방법
세 방법 모두
constructor프로퍼티가 원래의 생성자 함수를 바라보도록 조정해 줘야함